
How to Start an Awesome Blog
 Nathan Finch——Last Updated on March 10, 2025
![]()
![]()
![]()
![]()
![]()
![]()
 The below guide is a no nonsense guide to starting your own blog. This is the same process we have used to help countless new bloggers set up their first site and realize that it only takes a little bit of research to build a great blog.
In less than an hour you’ll know pretty much everything there is to know about starting your own blog.
Now I realize some of you might actually enjoy reading, so let me mention that reading this entire guide will take about 13 minutes and 45 seconds (roughly).
Finding The Right Blogging Platform
 One of the best ways entrepreneurs can get their business off the ground is by starting a blog. Small business owners are surprised by the opportunities that are presented as a result of their blog.
However, you might be thinking to yourself, my specialty is baking cookies, crocheting small hats for kittens, or making decorative flowers out of paper. (Yes, those are all real things people make money with.)
You might not feel like you’re technically inclined. If you are just getting your business off the ground, you probably don’t have a couple of grand just sitting around to give to someone so they can set your blog up for you. Just to be clear, I am definitely not knocking web designers. You guys rock, and we love you.
Well, don’t worry. I’m going to show you a do-it-yourself way to get your blog off the ground using the do-it-yourselfers best friend, WordPress.
I am going to assume that you know the difference between a website and a blog. If you don’t, here’s a simple way to think about it: “All blogs are websites, but not all websites are blogs”.
Your blog allows you to show posts in chronological order with the most recent post showing up on top. Of course, as with all things, there’s more to it, and I will talk about that in a different guide. But for the sake of brevity, let’s get down to what you need to start your own blog.
First, let’s get some simple terminology out of the way:
Domain Name
Simply put, this is your address. It’s where people can find you.
CMS
This is your workshop. This is where you construct all of the little things that make your posts unique to you, such as the content, images, media, everything connected to your page. When the product is complete, you present it to the world. In this case, your CMS, or workshop, is WordPress.
WordPress Theme
This is the basic structure or template used to make your blog. These themes give you a basic framework that’s going to be appealing to your audience, and then it allows you to modify it so that it also reflects you.
Web Hosting
 If WordPress theme is the structure, web hosting is the area that you construct the structure on.
This is where all the information about your site is stored. There are a bunch of options out there.
Some are good, and some are downright junk. For my money, SiteGround is your best option.
Why You Need To Use WordPress
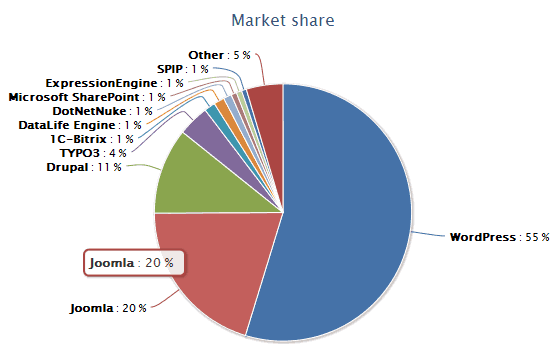
A content management system is a simple way to define the system for managing, updating and setting up your blog. As of 2018, WordPress is the most popular (and reliable) CMS out there.
Internet statistics show that 55% of websites online use WordPress, 20% use Joomla and 11% use Drupal.
Couple of big sites that use WordPress:
- New York Times
- Vice.com
- BBC
- TechCrunch
 Each of these methods are great for starting your own website or blog.
If I were to suggest one, I would say that if you had more time on your hands learning how to use WordPress is your best option.
WordPress is incredibly easy to use and offers a lot of functionality you won’t get elsewhere.
I’ve successful taught people with no website building experience how to use WordPress in less than 45 minutes so don’t be worried about the difficulty level.
So for that reason I’m going to be focusing on WordPress and not any of the website builders. However, I’ll have another review of just those for anyone who is interested.
Here we go! Time to get into the meat and potatoes!
Benefits of Using WordPress
There are a lot of different websites editors out there and more of them really stink compared to the power and flexibility of WordPress. Now I know there are a lot of other options out there like Tumblr, Blogger and a host of other “make your own free blog” platforms.
I would advise you to avoid all of them. The reasons are pretty simple:
Free doesn’t mean free. It means they are going to add their own domain name in the URL so unless you want lucasblog1.tumblr.com or lucasblog1.blogspot.com (because good luck getting your name) you won’t have your own URL or domain. Owning your own domain is INCREDIBLY important.
 Let’s mention this point again, owning your own domain is like owning your own digital identity. It’s yours and noone elses, don’t borrow it from someone else.
WordPress has 72 million users. That means a massive online community of developers and tools at your disposal. Literally any modification you want is there.
It’s incredibly easy to use and there are like a zillion Youtube videos for everything you want.
It’s super secure. If you don’t believe me… NASA uses WordPress. Are you better than NASA?
Want a cat-themed website? No problem there is a theme for that. Anything you want is available via themes and plugins.
You just don’t be able to match the customization and ability to edit your site that WordPress gives you.
Why Using Completely Free Websites Is Not Good?
If you’re planning on building something that represents who you are and what you’ve seen done, eaten or created before than don’t use a free site.
You want to own what you’ve created and not have it be the property of someone else. I’ve met so many people who have created a website thinking it will just be a little side project and then find out they either love it or that is has some real potential to make money but they are stuck with the domain.
You don’t own the content. You are using their proprietary software and they can shut you down at any time. They can even steal your content. You literally have no right to it.
If you want to move your URL you won’t be able to. If you’re planning on bringing any organic search traffic (when people search on Google) switching your URL is literally the worst thing you can do.
You can’t advertise on it. Advertising on another person’s platform is against their rules. They own that traffic and not you.
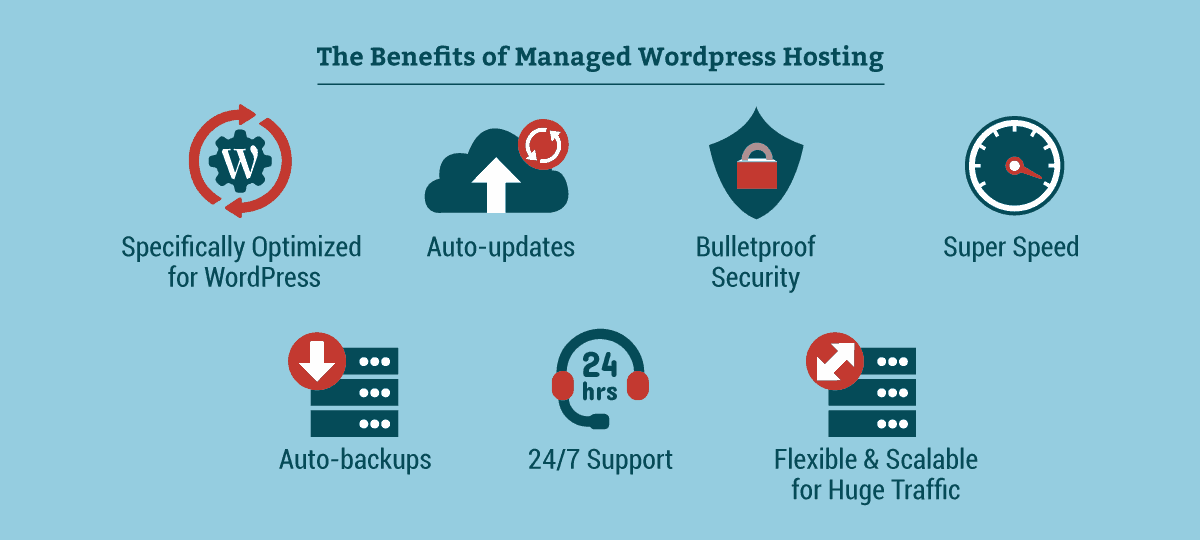
Luckily, these days with the hosting market being as competitive as it is hosting companies are really stepping up and offering quality prices and packages for a fraction of what they used to.
Things to Do Before the Next Section
Pick the hosting platform that you want to use. I highly recommend using WordPress. If you’re looking to use another platform than this guide won’t really be that useful for you.
Take time time to think about the domain name or kind of brand you’re trying to build
Register Your Domain and Get Hosting
Before you get your own unique URL you’ll have to register it. The way registration works is basically you make a claim on a unique address of letters or numbers that are registered to your name or company.
Should I Get a .Com or .Org?
It doesn’t really matter what you get from a register perspective. You just want to make sure you pick something easy to remember and catchy. The shorter the better and avoid putting numbers or dashes in your blog name.
You can also register using a country extension. For example if you’re from Canada you could register a .ca domain or if you’re from the UK you can get a .co.uk one.
How Much Does It Cost To Register?
 Most hosts costs about 10 dollars a year.
If you’re paying any more than that then congratulations you’re getting thoroughly ripped off!
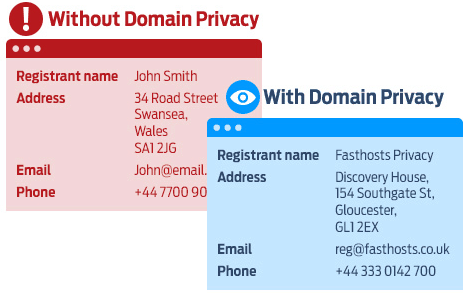
One thing you’ll definitely want to get a Domain Privacy Protection.
This stops nosy people from seeing your name/address/email on the domain.
If you don’t have privacy setup you’ll be spammed by every African prince trying to send you fast amounts money to your bank account (Internet joke warning).
Siteground has 100% free Privacy Protection which is usually anywhere from $10-20 extra a year.
Here at Aussie Hosting we compare data on the top Australian hosting providers to help customers make the best decision when it comes to hosting. So we know a thing or two about a good host. In fact we maintain hundreds of websites for clients which gives us access to 4+ years of hosting server data.
You’re gonna be overwhelmed by a million different hosts out there but when it comes to basic blogger hosting you don’t need anything fancy and you don’t want anything too cheap.
- Too cheap = Incredibly slow website with TONS of upsells (you’ll end up spending more in the long run)
- Too expensive = If you’re running a blog you don’t need crazy amounts of power.
So we want something just right.
And that is SiteGround – our recommended hosting provider. You’ll be hard pressed to beat SiteGround’s awesome pricing and great 24/7 customer support. They also offer 1 click WordPress installs. ONE CLICK!
You’ll need to signup first, so take a look at their pricing. I recommend going with their most basic package and nothing too fancy.
How To Setup WordPress On Siteground
Once you are on their website, you’re going to see that they offer three basic hosting plans:
Startup Plan
- One Website
- 10GB HD Space
- Free Backups
- Some Free Addons
- For sites with less than 10k daily visitors
$6.99/month
If you’re not quite sure what you’re going to need, I recommend the Grow Big Plan. It gives you the flexibility to grow but does not give you more than you can chew. It’s also priced very competitively.
Once you’ve chosen your plan, now it’s time to put in contact and payment information.
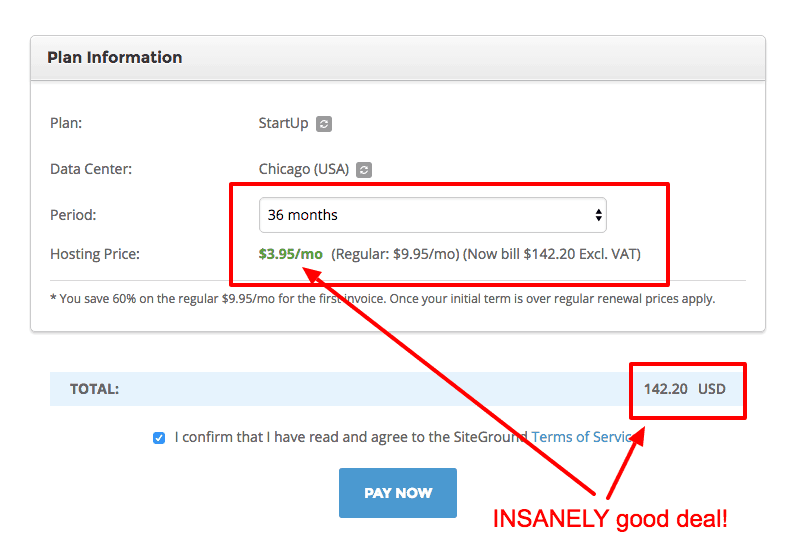 Finally, you need to choose how many months of hosting you’re going to purchase.
What’s slick about hosting is that the more you buy, the cheaper it gets.
Which is great!
You’ll then be asked to either pick a domain name or use an existing one.
The below explanation is if you don’t have a domain name and want to register it.
If you already have a domain, you’ll need to point the Nameservers to the hosting records (here is a complete walkthrough how to do that).
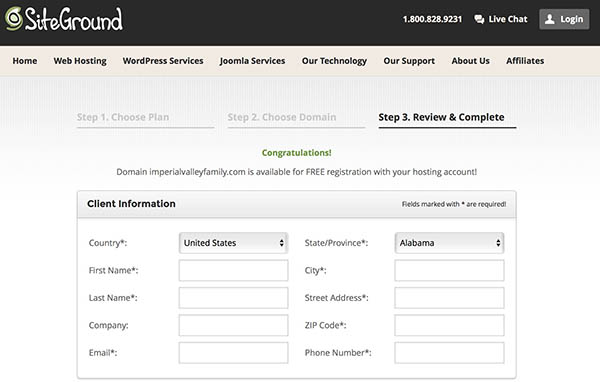 SiteGround will give you a FREE domain with your hosting plan, so if you don’t have one I suggest just using this option.
You’ll also be asked to fill out some of your personal details for your domain registration.
Don’t worry about this though.
If you register a domain via SiteGround or another service like Namecheap, you’ll get free privacy protection meaning none will be able to see your identity.
However, for registration purposes I highly advise using your real information or you could lose your domain name.
There are 2 ways to install WordPress on your new website. Let’s look at both of them.
- Have a SiteGround Expert Install for You (Incredibly Easy)
- Install it Yourself (3 Simple Steps Shown Below)
Method 1 – Having Siteground Install It
 This is one of the reasons why I love SiteGround.
Their support team installs WordPress for you for free.
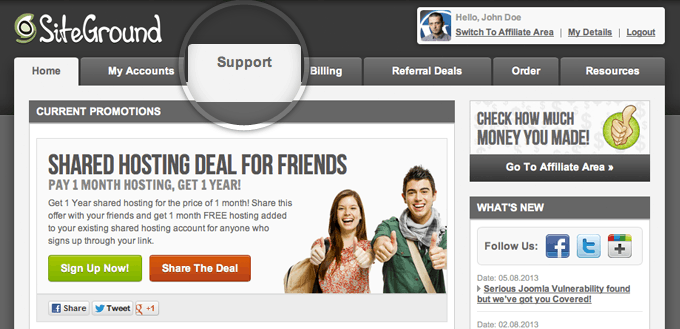
All you have to do is sign up for your hosting.
Put in your login credentials, and click the “Support” tab.
Scroll down and you’ll see a section for “WordPress Assistance.” Follow the instructions and you are as good as gold.
From there they will guide you though it step by step, including asking you to pick a password/login for your website. This entire process will take about 3 minutes.
Method 2 – Install WordPress Yourself
After you have signed up for your account and paid for your plan. Go to the homepage of Siteground.com and log into your account. You’ll get to this screen.
 Click the Go to cPanel option and once you’re in you’ll see the interior of the cPanel control area. Don’t be intimidated, you’re almost there.
You’ll need to click on the Installer or Softuclous Installer, they both work the same.
Next you’ll get to an agreement screen about WordPress and on the BOTTOM LEFT you’ll see an area that says “Install WordPress” click that and then you’ll get here. Follow the instructions on the page.
You’re done! Congrats!
The last step is logging in and making sure it all works. You’ll need to go http://yourwebsitesname.com/wp-admin. Just type “/wp-admin” after the URL and you’ll get to this screen. From here just login.
Installing a WordPress Theme
![]()
![]() As a beginner to WordPress, it’s likely you’ve heard about all of the themes that you can either get for free or that you can buy.
As a beginner to WordPress, it’s likely you’ve heard about all of the themes that you can either get for free or that you can buy.
It’s a good idea for you to play around with a few of the themes that are available to see which theme is right to meet your needs.
Remember, your theme is the structure of your page. It’s what people see. So you want your theme to be as attractive as possible.
Just a beginner’s tip, the second you activate your new theme, it will instantly change the way your website looks and functions to the world. Some of the functionalities of the previous theme may not transfer over to the theme you’ve selected, so it’s good to a quick checklist to make sure your new theme is going to work.
The WordPress.org themes directory is an easy way to select your theme.
First, log into your WordPress admin area.
Then click on Appearance>> Themes.
 After you do this, you will be redirected to the themes page.
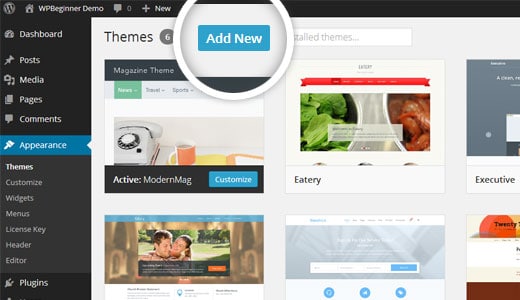
Once there, select the “Add New” button, and that’s going to be located on the top.
Next, you’ll have the option to select the latest WordPress themes, popular themes, and the featured themes.
Here is a great list of all the free themes online.
Based on the selection that you make, you will either see one theme or you will see multiple themes based on the criteria that you’ve set out.
When you find the theme that you want to install, put your mouse over the image. You’ll see an “Install” button, a “Preview” button, as well as a “Details” button. Click the “Install” button.
WordPress will begin the install process. You will be presented with a message showing you that the theme has been successfully installed, and you will be given the option to activate it.
Some themes will have extra options for you to configure or customize, depending on the theme that you select. Once you have selected your domain name, purchased hosting, installed WordPress, and selected your theme, you are ready to start blogging.
Now comes the tricky part. Getting your blog seen by others.
Configure Your Blog to Be Search Engine Friendly
If you want a blog that is search engine friendly, it’s important to remember that search engines are like your very vain and superficial friend, they don’t like ugly. What do we mean by that? Here is an example of what a search engine deems an ugly URL:
HTTP://my blog/2018/special topic/author – me/my ugly blog
From a search engine standpoint, a more attractive way for your URL to look is:
HTTP://my blog.com/my beautiful blog
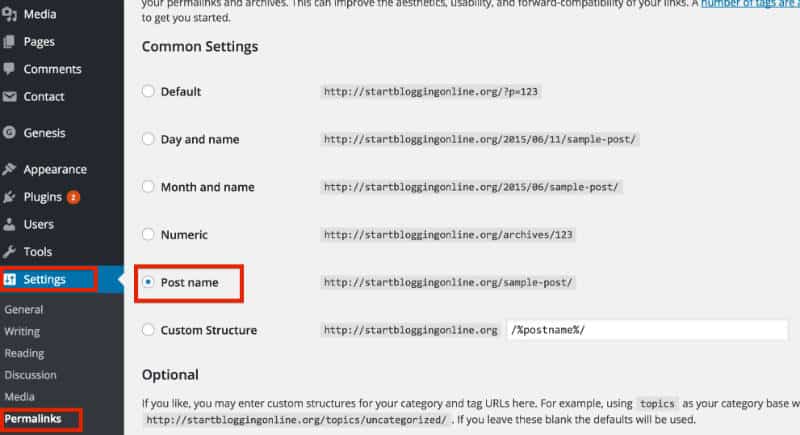
The difference is clear. The first option is full of unimportant information. The second URL is clean and to the point. Thankfully, WordPress helps you make your URLs search engine friendly.
To accomplish this, go to “Settings”>> “Permalinks” and change your settings to look like these:
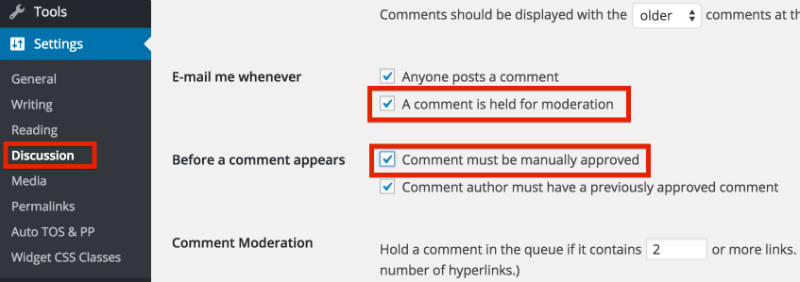
The second thing that search engines hate, just like real people, is spam. Unfortunately, people will want to spam your site. They want to get people to visit their blog, they want to advertise their junk, or they want to use your blog as a way to promote their products.
However, you can stop them by moderating your comments. Do that by going to “Settings”>> “Discussion” and then click the following options:
Start Writing Posts and Pages
Now, you have a WordPress blog that is fully functioning. You have an awesome domain name that reflects you and your business.
You have selected a killer theme that is perfectly suited for you. You’ve done a lot. Take a few seconds and pat yourself on the back. You have every right to be proud. Okay, enough self-congratulating. Let’s get back to work.
In this section, we want to focus on three things:
- Writing posts on WordPress
- Adding images, links, and formatting text
- Quick tips for writing stellar content
How to Add A New Post?
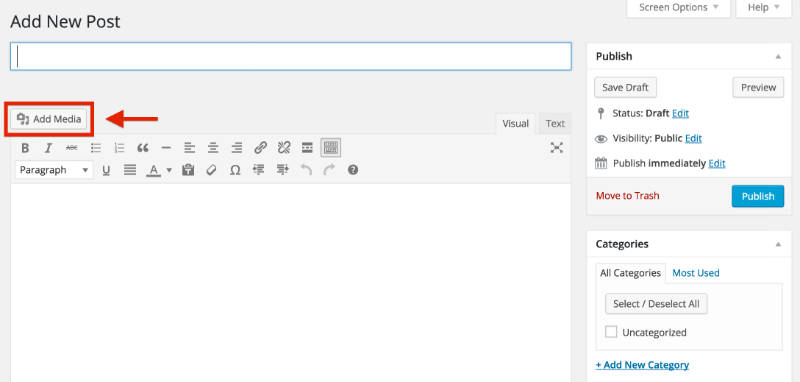
On the admin side of your site, click on the post link that appears in the menu on the left side. From there, click add new.
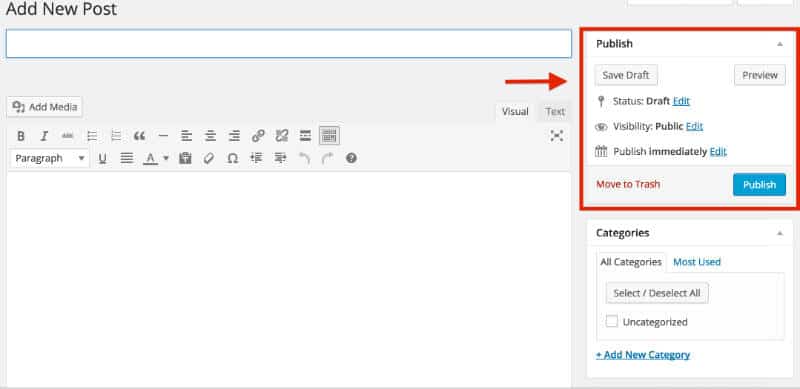 If you look at this image, you see that the uppermost field allows you to give your post a title.
Underneath, in the larger space, you are able to write your post or your actual content.
From there, you can opt to save your content as a draft.
Or if you’re happy with what you’ve written, you can publish it. You can select these options using the menu that appears on the upper right-hand side of the page. Other options include scheduling the post to publish at a later time or labeling the post as private so that only selected individuals can see it.
Once you published your post, simply go to the “All Post” section of the menu on the left-hand side. There you can bring up anything you’ve already posted and edit it at your discretion.
Of course, nothing could be more boring than a plain brick of text. So let’s look at some things you can do to give your post a little life.
Adding Images to Your WordPress Blog
 Everybody likes pictures.
WordPress allows you to add pictures to your post with a few clicks of the mouse.
If you look right above the field where you posted the body of your blog, you’re going to see a button entitled “Add Media”.
However, before you go all willy-nilly adding pictures here and there, we recommend that you left click your cursor on the part of your blog where you want the image to be.
If not, you’re going to have to move it around later, and that can be frustrating. You are going to be directed to another page where you will be allowed to upload files. In the center of that screen you will see a button entitled “Select files.”
Once you find the files, they will be automatically uploaded to WordPress. After the image has been uploaded, double check it to make sure it’s the image you want, and then click “Insert into Post.” The image will appear in the post that you are writing where you want it to appear. It’s just that easy.
Adding Links to Your Blog
Something you’re going to quickly learn as a blogger is that the best way to get people to read your content is by linking out to others.
There are a lot of good bloggers out there. Quite frankly, some of them are going to be better than you. The relationships you build with them and your ability to share their content will only add value to your blog. So here’s how you do it.
When you look at the toolbar that sits right above the field where you added the body of your post, you’re going to see something that looks like a chain link.

Once you click the “Insert/Edit Link” button, you will be directed to a pop-up that’s going to ask you for some information.
Helpful Dictionary
The URL is the address of the website you want to share. Remember to include in the “HTTP://” in front of the “www.”. If you don’t, your link is not going to work.
The link text is what you want people to click on in order to get to the site you’re linking to. So if you’re linking out to a site about competitive walking, the link text might be “walking with military precision.” When a person clicks on that, they’ll be directed to the site you’re linking.
Open link in a new window/tab. You always want this option to be selected, because if you don’t, if a person clicks on the link text, they’re going to leave your page and might not be able to find their way back.
Link to yourself. You may want to link to something that you have on your own site. You can use the search section to find that post or that page and add a link to it.
When it’s all said and done, click add link and the link will appear where you left your cursor when you are writing.
How to Edit Headers and Format Your Blog’s Text
 Most people do not read a blog, they scan it.
They run their eyes over the blog in an F formation, looking for bold text that catches their eye.
If nothing catches your readers’ eye, they may simply turn away, and that’s not what you want. You can prevent this by adding headings.
You can add a heading by clicking on the drop-down menu located on the lower left side of the toolbar.
As you can see, “Heading 1” is the largest size. This should be what is at the top of your page. “Heading 2” or “Heading 3” can be used further down on the page. This not only makes it easier for the search engine to read your site, but makes it a whole lot more pleasant for the people who are reading your site.
How to Edit Fonts
 You can also edit your fonts, either making them bold, italicizing them, underlining them, and even changing their color.
All it takes is a click of the button.
- “B” is for bold
- “U” is for underlying
- “A” will allow you to select different colors from a drop-down menu
- “I” is for italics
If you’ve worked with Microsoft Word, all of these commands should be pretty simple.
Conclusion
Well, that’s it. You have gone through all the steps and have set up a successful basic blog. Now, the question is, how can you make your blog work for you?
This can be a challenge. But I’ve put together some guides that will make it easier for you. In the near future I will be sharing this information with you as well as address any questions that you might have. Until then, I recommend you get familiar with WordPress.
It is a very versatile tool. It is intuitive and easy to learn. Thanks to its preset themes, with just a few clicks of the mouse, you can create a blog that looks professional and is garnering you and your business the attention you deserve.