
Transferring Files from Server to Server with SSH
 Nathan Finch——Last Updated on March 10, 2025
![]()
![]()
![]()
![]()
![]()
![]()
 Occasionally, it might be necessary for you to move your website from one server to another. In other cases, you may need to move specific files from one server to another for increased security, for maintenance, or even just to back-up files on your primary website.
No matter your exact needs, understanding how you’re able to transfer critical files from server to server with SSH is important. SSH transfers allow you to move files from server to server without having to download a complete website or all if its files to a local computer and manually upload that website to another server.
Today, let’s break down how you can transfer your business or website’s files from a local or remote server to another remote server using SSH step-by-step.
Table of Contents:
What is SSH Protocol?
 SSH is short for “Secure Shell”. SSH itself is a specific kind of network protocol that does one major thing: it establishes a very secure data transfer channel over a normally unsecured network. This can be used to access and control various network services securely, to transfer files safely, and more.
As opposed to the majority of other FTP applications, SSH is controlled through either the Windows Command Prompt or the Terminal for Mac/Linux devices.
Fortunately, modern computers made with Windows 10 or later have SSH transfer compatibility out of the box. All Linux and Mac computers also include SSH file transfer functionality by default.
What else do you need to run SSH or transfer files? Not much. The majority of servers operate with Linux anyway. Unless your server runs on IIS, which is essentially Windows’ version of Linux, you should have default access to SSH no matter what. The only third-party tool or application you’ll need to install is Putty.
SCP Explained
 When you transfer files from one server to another through SSH, you’ll use the SCP, which stands for Secure Copy Protocol. In a nutshell, the SCP allows you to transfer files or even entire folders securely between devices. More importantly, SCP is highly related to and based on SSH, as both protocols are used in conjunction with one another.
With SSH, users can upload files very securely to a remote server or they can request or download secure files without compromising data security at either end of the process. On top of that, SCP can let you transfer files to remote servers, making this file transfer method excellent for dispersing information to multiple devices quickly.
How to Transfer Files from One Server to Another
So, ready to learn how to transfer your files across servers with SSH? This tutorial will explain the process as if you planned to send files to a remote server using a standard Windows computer. Before you begin, be sure to install Putty, which is a third-party application you'll need to follow this tutorial.
Step 1 – Log-In to Both Servers Via Web Consoles
 First, log in to the destination or remote server and local server using their web consoles (both the transmitting and receiving servers). Access the control panel for your remote server and make sure that SSH is enabled on each of the servers, as otherwise this will not work.
By default, SSH access is disabled unless the box for it is checked. So you’ll probably have to activate SSH access on both servers. If you can’t find a control for SSH access, contact your server provider’s technicians or consult your server’s operating system documentation.
Look at your server’s SSH username, which is typically assigned by and made by the server itself, and record it for later. Then enter and/or reenter the password needed to complete SSH account certification.
Note that, of course, you’re allowed to change the password. But instructions to do this are based on the specific server. Once again, refer to your operating system documentation if needed.
Next, record the Secure Shell Connection Information, which is needed to connect to your remote server through the SSH client. We’d also recommend recording the servers’ host keys so you have extra security.
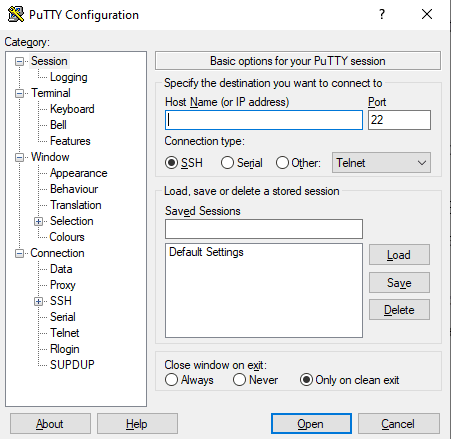
Step 2 – Activate Putty
Now it’s time to activate Putty. When you do this, you can set up a new SSH connection to your remote server. To do this:
- ☑️ Enter the needed information in the box labeled “Host Name”(Located in the configuration window)
- ☑️ Click “Initiate Connection” or the equivalent button
- ☑️ If it’s your first time connecting remotely to a new server, Putty may pop up a security alert. Dismiss it
- ☑️ If it’s not your first time connecting to the server, the security alert could indicate a digital attack
If you know the connection between your remote server and local server is legitimate, click “Confirm” or “Yes” depending on your server’s inputs. Putty will now give you a new terminal window in which you can input your username, password, credentials, and other necessary information.

Once your password is entered, the terminal window opens up and gives access to the command line for the server. Similar to Windows “run” functionality, this will allow you to enter your commands in the terminal window and give you some administrative control over the server.
Step 3 – Navigate to the Right Destination Folder
Now it’s time to navigate to the destination folder for your transmitted files using Putty. Be sure to double check the files already in the destination folder and make sure that you are at the right place.

Step 4 – Transfer Files with SCP
Then simply use SCP to transfer the files from your local server to a remote server. You’ll use code syntax like this to accomplish this task:
In this code, “scp" indicates the core command that activates the SCP functionality. “Switch” is an optional and additional parameter that isn’t needed if you’re only transferring one or two small files or if you are transferring multiple files from one directory that are intended to be sent to the same folder.
“Content location” may vary depending on the end location. Swap out the content location as needed for both the source of the files and their end destination.
The Bottom Line
Learning how to host your own website can be as difficult or as easy as you want it to be. The easiest way to host a website is to use a hosting provider that does virtually all the work for you.
Furthermore, if you have a WordPress site, finding a provider specific to that platform is the easiest way to host your website. However, if you want a bit more freedom, more of a challenge, and an overall project, you can try to build your own server at home.