
How to fix “Server DNS Address Could Not be Found” Error
 Nathan Finch——Last Updated on March 10, 2025
![]()
![]()
![]()
![]()
![]()
![]()
 Google Chrome is one of the most popular web browsers. It's integrated with all of Google's other software and apps, and many people appreciate this connectivity.
Chrome is compatible with numerous operating systems like Windows, macOS, Linux, Android and iOS.
Additionally, the browser is open-source software, which helps to take care of bugs in a relatively reliable manner.
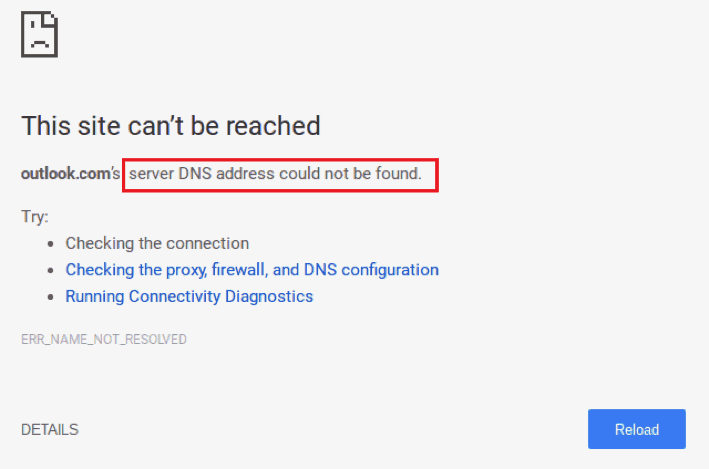
However, some problems are better solved at the user level. One of these is the "Server DNS Address Could Not Be Found" error.
Let's take a closer look at what this error means.
What's DNS?
 DNS stands for "Domain Name System."
All of the websites that you visit have names that are easily read and understood by humans like Amazon.com and Nike.com.
What some people don't realize is that websites also have an Internet Protocol address. This IP address is a series of numbers. If you were to enter the series of numbers where you would normally enter a domain name, you would arrive at the same destination.
Recognizing that remembering long strings of numbers would be difficult for most people, early Internet pioneers came up with the DNS. It is the responsibility of DNS servers to match up domain names with IP addresses.
When a user enters a domain name, the computer requests a matching IP address from the server. A connection is made and the website opens. Generally, this is a process that happens almost instantaneously.
DNS Address Error
Sometimes, things don't go smoothly. This is the case with the "Server DNS Address Could Not Be Found" error. In these situations, the DNS cannot find or "resolve" the website's IP address.
The result is that this website will not load on your computer. This problem is reported far more frequently on devices that run Windows. Nonetheless, Mac users may encounter a similar error.
Easy fixes for the "server DNS address could not be found" error are below.
Update Your Drivers
When drivers are outdated, corrupt or incorrect, then you may see a DNS error. A manual driver update can be performed by visiting the manufacturer's website for your device. Your issues may be resolved simply by downloading the latest version of the driver.
If you prefer to automate this process so that your drivers are always up to date, sign up with a service like Driver Easy. This service automatically scans your devices to detect when a new driver is available. All you have to do is periodically choose "Update All" to see fewer error messages.
Switch to Google DNS
Google has Public DNS, which is an alternative to the DNS service used by the majority of the population. Switching to Google's Public DNS may resolve your issues.
Just follow these instructions:
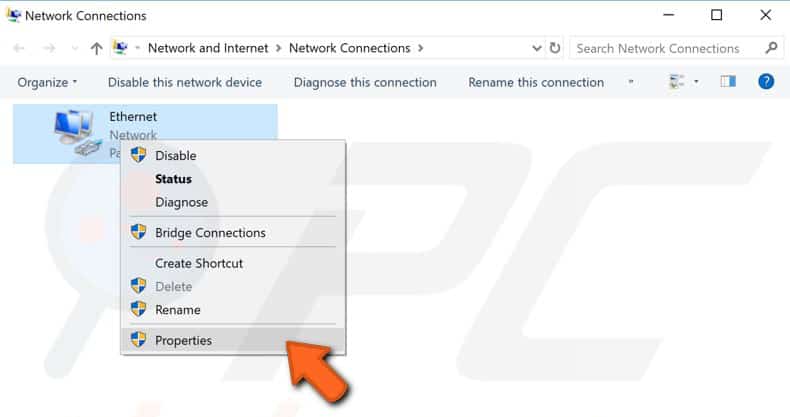
- ☑️ Navigate to Network Connections
- ☑️ Right click on the start menu
- ☑️ Select Network Connections
- ☑️ Select Connection Type, i.e., Ethernet, on the left side
- ☑️ Then select Change Adapter Options on the right side
- ☑️ Right click on the connection you chose, then click on Properties in the drop-down menu
- ☑️ First, choose Internet Protocol Version 4 (TCP/IPv4) and then click on Properties
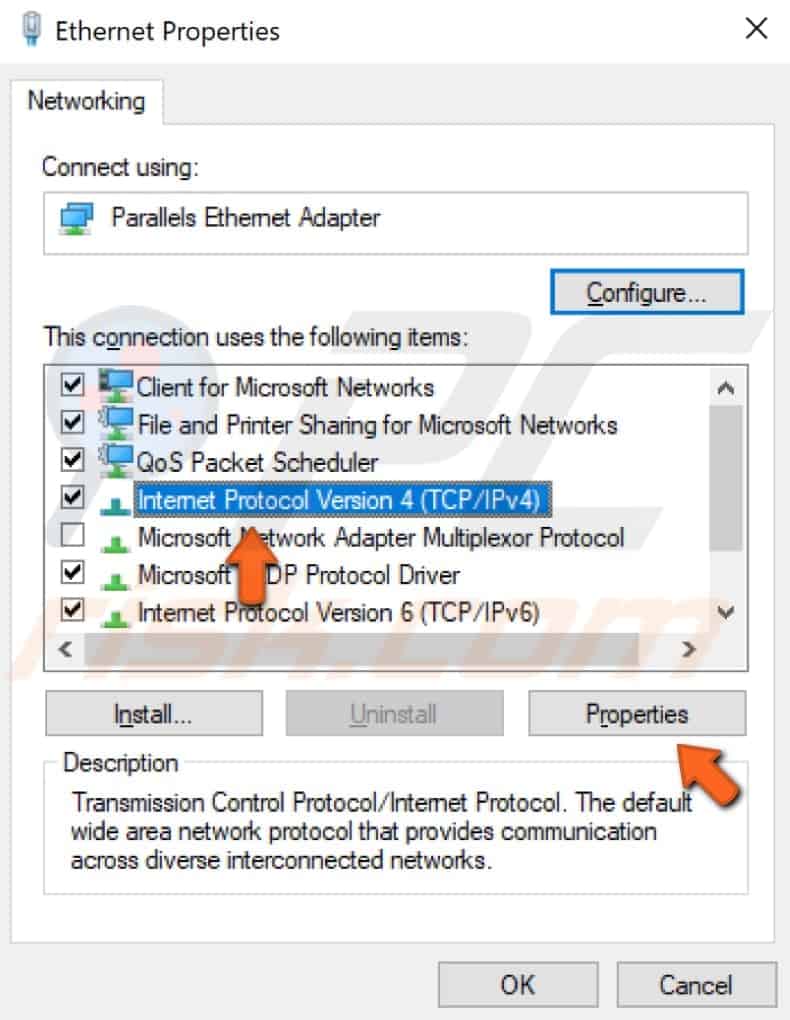
- ☑️ Within the Internet Protocol window, choose Use the following DNS server addresses, entering 8.8.8.8 in the box for Preferred DNS server and 8.8.4.4 in the Alternate DNS server box.
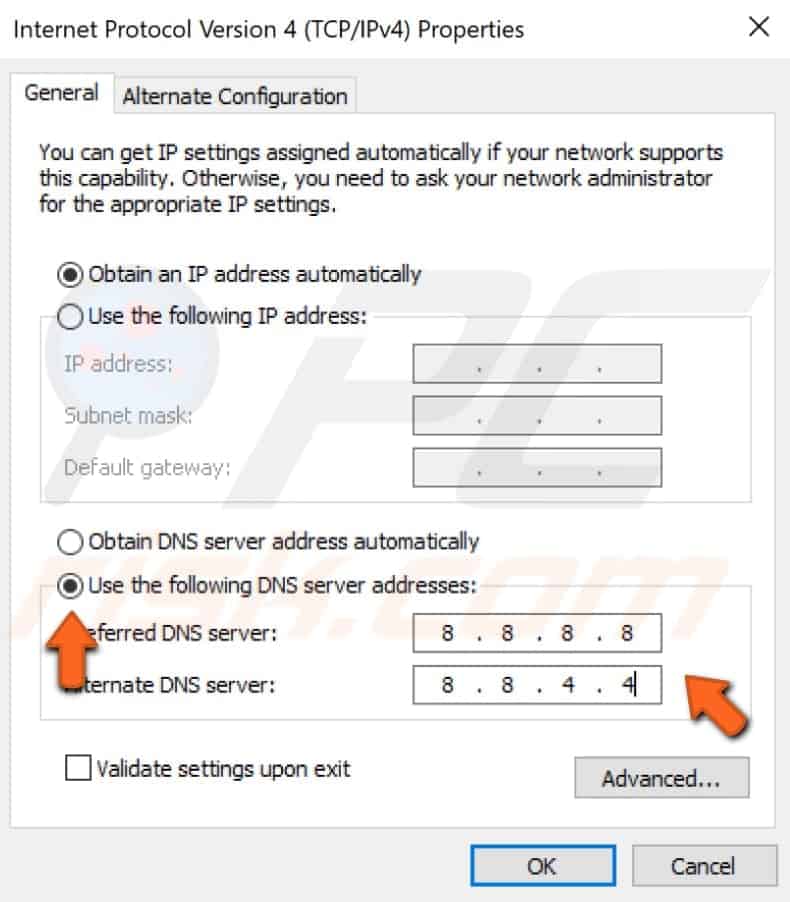
- ☑️ Click OK
- ☑️ Reopen Google Chrome to see if this resolved the issue
Clear the Host Cache
 If the error is not resolved, then you may need to clear Chrome's host cache. This fixes the error if the problem is caused by one of Chrome's extensions.
Follow these steps:
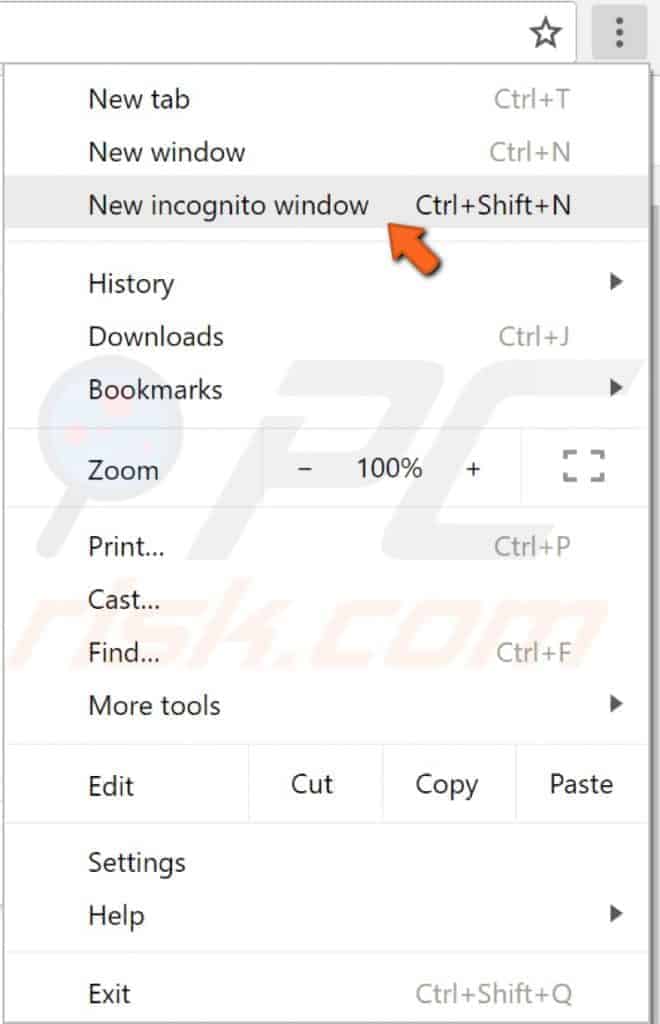
- ☑️ Open Chrome
- ☑️ Open a new Incognito window
- ☑️ Type "chrome://net-internals/#dns" in the address bar
- ☑️ Enter
- ☑️ Click the button labeled "Clear host cache"
![]()
![]()
- ☑️ Check to see if the error is resolved
Renew and Clear DNS Cache
If things still aren't resolved, then you may need to execute "netsh" and "ipconfig" commands to renew and clear the DNS cache.
This is easier than it sounds. All you have to do is follow these instructions.
- ☑️ Simultaneously press the Windows button and the letter R on your keyboard
- ☑️ Type CMD in the text box that comes up
- ☑️ Simultaneously press ctrl + Shift + Enter to bring up the admin Command Prompt
- ☑️ Type these commands in the Command Prompt Window:
netsh int ip reset
netsh winsock reset
ipconfig /release
ipconfig /renew
ipconfig /flushdns
- ☑️ Press enter after each command so that each one occupies its own line
- ☑️ Restart the computer
- ☑️ Check to see if the error is resolved
Restart the DNS Client Service
When you run Windows on a device, the programs rely upon "Windows Services" for many functions. You also can modify how these services are run on your particular system. The DNS Client Service is just one of these services. If you restart this service, then your DNS error may be resolved.
The restart can be accomplished with these steps:
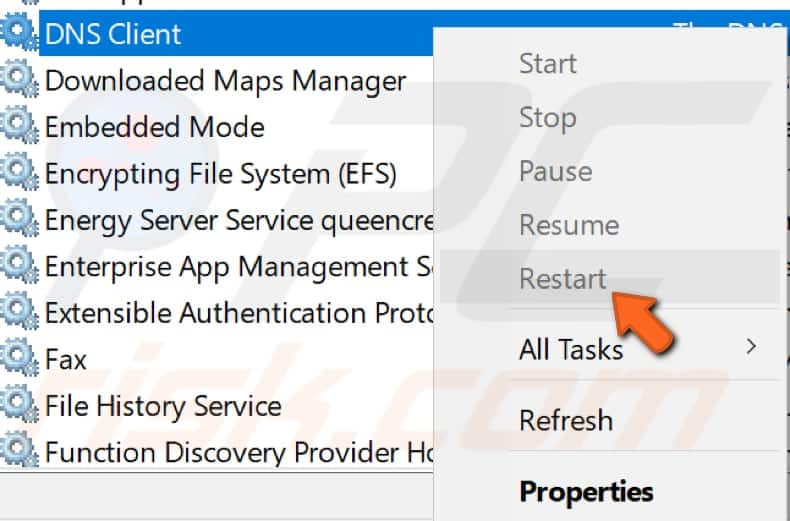
- ☑️ Simultaneously press the Windows key and the letter R on your keyboard
- ☑️ Type services.msc in the dialog box
- ☑️ Click OK
- ☑️ Right click on DNS Client
- ☑️ Choose Restart
- ☑️ Close the Services window
Restart the computer, then launch Chrome to see if this fix worked.
Bonus Fix for Mac Users
This particular error is rare on Mac devices. However, if you see it or something like it pop up, then you may need to change your DNS server configuration.
Use these steps:
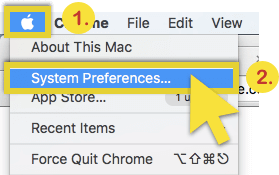
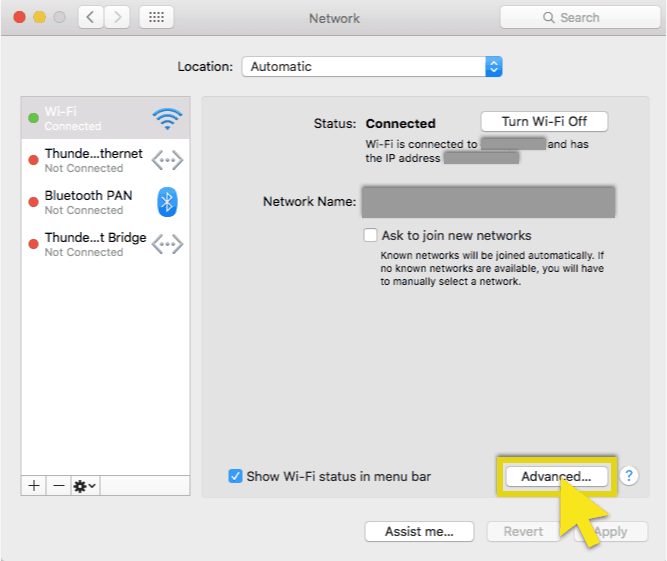
 ☑️ Choose System Preferences on the Apple Menu
- ☑️ Click on Network
- ☑️ Find the navigation bar on the left-hand side
- ☑️ Select your Internet connection
- ☑️ Click Advanced
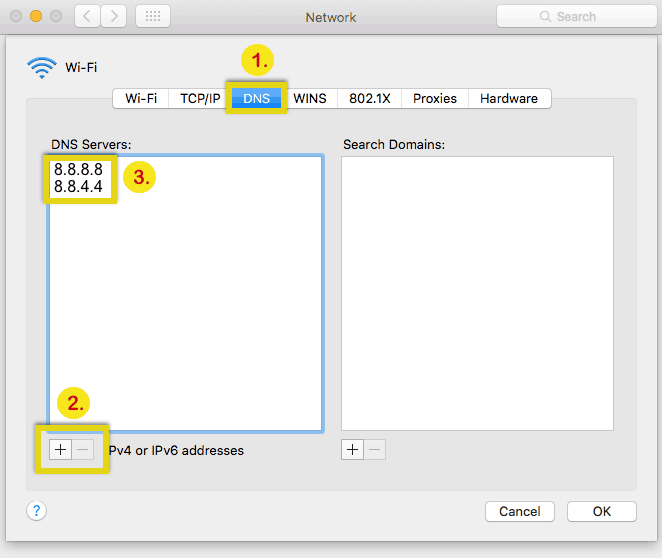
- ☑️ Choose the DNS tab
- ☑️ Under the DNS servers option, choose and remove the existing addresses
- ☑️ Then, add Google's DNS server addresses as 8.8.8.8 and 8.8.4.4
- ☑️ When complete the screen looks like the following:
- ☑️ Click OK
- ☑️ Click Apply
- ☑️ Restart the computer
- ☑️ Launch Chrome to see if the fix worked